In this post, I want to talk about how to use Hugging Face to build and deploy our NLP model as a web application. To do this, I’m going to use the Distilled Turkish BERT model and fine-tune it on a Turkish review dataset. Later, I’m going to make use of the Streamlit library and Hugging Face Spaces to showcase the final model so that the other people can use it without any code.
Preliminary Step
Before beginning the whole process, let’s install the necessary packages and import the libraries:
#huggingface_hub to login into our huggingface account later
!pip install datasets transformers huggingface_hub
import torch
torch.cuda.is_available()
!sudo apt-get install git-lfs
1. Loading our dataset via the “Datasets” library of Hugging Face
from datasets import load_dataset
review = load_dataset("sepidmnorozy/Turkish_sentiment")
2. Using Hugging Face’s “Transformers” library for preprocessing and loading our model
To briefly explain, when our dataset is ready to be preprocessed, we need to use the “Transformers” library both to preprocess it, and load the model itself for the fine-tuning with it. Therefore, this whole process can be divided into two subsections: a) Loading our tokenizer using the “AutoTokenizer” class of the library
In the context of the transformers, tokenizers are used to do the preprocessing to the raw data we have. Therefore, before any fine-tuning, we need to load the tokenizer of our current model via the AutoTokenizer class:
from transformers import AutoTokenizer
tokenizer = AutoTokenizer.from_pretrained("dbmdz/distilbert-base-turkish-cased")
In this case, since we are dealing with a relatively large dataset, we can use some of its examples to avoid any memory storage/lack of any computational resource. Let’s take random 2000 and 200 examples of the training and test sets, respectively.
small_train_dataset = review["train"].shuffle(seed=42).select([i for i in list(range(2000))])
small_test_dataset = review["test"].shuffle(seed=42).select([i for i in list(range(200))])
Now, since we have a dataset rather than a single string to preprocess, we need to define a function:
def preprocess_function(examples):
  return tokenizer(examples["text"], truncation=True)
Additionally, to apply such a function, we need to use the map() method:
tokenized_train = small_train_dataset.map(preprocess_function, batched=True)
tokenized_test = small_test_dataset.map(preprocess_function, batched=True)
b) Loading our model itself
Now that we have made our data ready for the fine-tuning, we can load our very model:
from transformers import AutoModelForSequenceClassification
model = AutoModelForSequenceClassification.from_pretrained("dbmdz/distilbert-base-turkish-cased", num_labels=2)
Since we want to use our model for binary classification, we set the num_labels to 2.
3. Defining Metrics
For a complete fine-tuning and evaluation, we need to define our metric (which is “accuracy” in this case) beforehand. To do that, we need to use NumPy and the Datasets library:
import numpy as np
from datasets import load_metric

def compute_metrics(eval_pred):
   load_accuracy = load_metric("accuracy")
   load_f1 = load_metric("f1")

   logits, labels = eval_pred
   predictions = np.argmax(logits, axis=-1)
   accuracy = load_accuracy.compute(predictions=predictions, references=labels)["accuracy"]
   f1 = load_f1.compute(predictions=predictions, references=labels)["f1"]
   return {"accuracy": accuracy, "f1": f1}
4. Loging into our Hugging Face Account
Before doing fine-tuning, to be able to push our resulted model to the hub, we need to login our credentials:
from huggingface_hub import notebook_login
notebook_login()
5. Fine-tuning our Model
Through its Transformers library, Hugging Face provides us with a convenient Trainer API to fine-tune the models with a few line of codes. Basically, to use it, we need to provide it with arguments to be taken into account during fine-tuning. Therefore, initially, our step is to define these very training arguments. Let’s load the TrainingArguments and Trainer first:
from transformers import TrainingArguments, Trainer
Now, let’s define the arguments and then use them in trainer:
repo_name = "distilbert-based-turkish-cased-sentiment"

training_args = TrainingArguments(
  output_dir='./results',
  learning_rate=2e-5,
  per_device_train_batch_size=16,
  per_device_eval_batch_size=16,
  num_train_epochs=2,
  weight_decay=0.01,
  save_strategy="epoch",
  push_to_hub=True,
)

trainer = Trainer(
  model=model,
  args=training_args,
  train_dataset=tokenized_train,
  eval_dataset=tokenized_test,
  tokenizer=tokenizer,
  data_collator=data_collator,
  compute_metrics=compute_metrics,
)
Now, we are ready to train our model:
trainer.train()
# TrainOutput(global_step=250, training_loss=0.577752197265625, metrics={'train_runtime': #49.4941, 'train_samples_per_second': 80.818, 'train_steps_per_second': 5.051, 'total_flos': #119551827287040.0, 'train_loss': 0.577752197265625, 'epoch': 2.0})
6. Evaluating and pushing our model to the hub:
Now that we have fine-tuned our model, we can use our pre-defined metrics to evaluate it on our test set, and then finally push it to the hub:
trainer.evaluate()
# {'eval_loss': 0.5146501064300537,
#'eval_accuracy': 0.78,
#'eval_f1': 0.83206106870229,
#'eval_runtime': 1.7692,
#'eval_samples_per_second': 113.047,
#'eval_steps_per_second': 7.348,
#'epoch': 2.0}
trainer.push_to_hub()
7. Using Streamlit to create an app:
The first for the deployment our model as a web app is an actual Python code that will “convert” our pure model to an app. To do this, we can use the Streamlit library. Here is a full example of how to use it to create an app script:
#installing and importing the necessary packages
import os
os.system("pip install torch")
os.system("pip install transformers")
os.system("pip install sentencepiece")

import streamlit as st
from transformers import pipeline
#Loading our model
from transformers import AutoTokenizer, AutoModelForSequenceClassification

tokenizer = AutoTokenizer.from_pretrained("azizbarank/distilbert-base-turkish-cased-sentiment")
model = AutoModelForSequenceClassification.from_pretrained("azizbarank/distilbert-base-turkish-cased-sentiment")
#Defining a function to classify the input text
def classify(text):
    cls= pipeline("text-classification",model=model, tokenizer=tokenizer)
    return cls(text)[0]['label']

# Making the layout of our web application through the st.container() function
site_header = st.container()
text_input = st.container()
model_results = st.container()

# Writing some content in these containers
with site_header:
    st.title('Sentiment Analysis')
    st.markdown(
    """
    This is my web application!
    """
)

with text_input:
    st.header('Is Your Review Considered Positive or Negative?')
    st.write("""*Please note that predictions are based on how the model was trained, so it may not be an accurate representation.*""")
    user_text = st.text_input('Enter Text', max_chars=300)

with model_results:
    st.subheader('Prediction:')
    if user_text:
        prediction = classify(user_text)

        if prediction == "LABEL_0":
            st.subheader('**Negative**')
        else:
            st.subheader('**Positive**')
        st.text('')
8. Using Hugging Face Spaces for the final deployment:
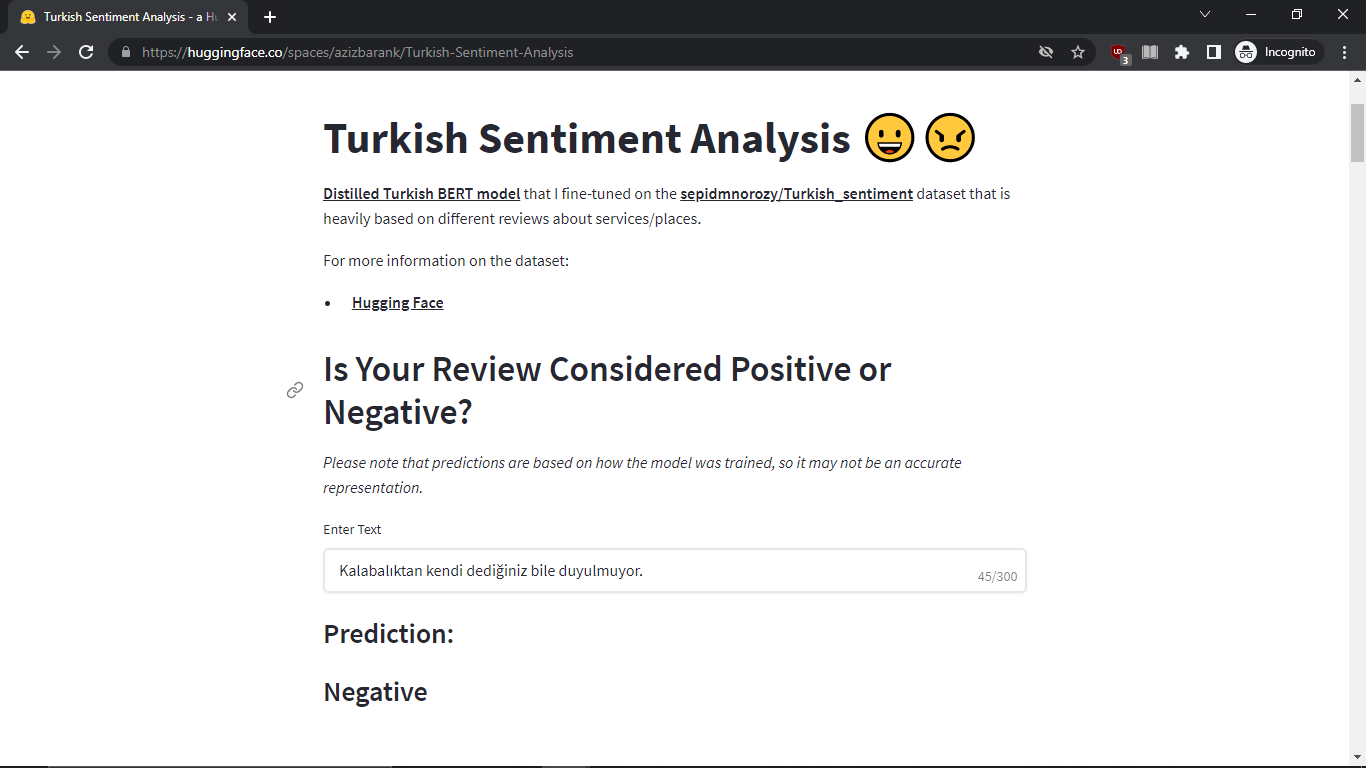
After this, you can simply navigate to your Hugging Face profile and click “New Space”. Then, by choosing the “Add File” option, we can simply copy and paste our script we just created using Python and Streamlit. The important thing is that since our code is a Python script, we should define it in the name of the file section above by simply adding the “.py” extension to the name of the file we make. After these, within a few seconds, the app should start running smoothly to be used by other people. I include here an example from my personal Hugging Face profile:
A Personal Example:
Conclusion:
In this post, we fine-tuned our language model on a dataset using Hugging Face’s Transformers and Datasets library. Then, we made use of the Streamlit library with Hugging Face Spaces to deploy our resulted language model as an interactive web app.
Thanks for reading and I hope this post will be of help to anyone wishing to build and deploy various language models.